Showing posts with label resourcefulness. Show all posts

Thursday, May 07, 2015

Use What You Have Zipper Pouches


I had this rather large piece of vintage-y quilted fabric in my stash. It came in a bargain bag of scraps from a yard sale a few years ago. 

Anyways, I've been trying to make use of what I have instead of buying more. Partly to save money but mostly because it means less to move around when my sewing room becomes a nursery. 

This fabric was already sewn into something and taken apart so this is not it's first party. Ha! It's a little worn in spots but perfect for these zipper pouches. 

I often need some pouches for storing items when traveling. I made one large enough to carry my hair straightener and then the second one ended up a little smaller because of the size of the fabric. 

I had some red gingham ruffle in my scrap bucket pile. I think it was given to me in a box of fabric?? 

Anyways, I liked it with the sweet strawberry fabric so I sewed some ruffles on the pouches. 

Even the zippers were repurposed from some old lingerie bags!!! 

So yay for a quick evening project that cost nothing to make but is cute and super useful! 
 I still have some small pieces of this fabric left--will have to see what I can make with them!


Wednesday, April 15, 2015

"Use What You Have" Spring Wreath

I've been wanting to make a wreath for our kitchen door. Something springy!

We had a yard sale last weekend and a couple straw wreaths were left. (They were donated by a friend.) So instead of donating them at the end of the sale, I decided to make some simple wreaths for our home. 

This one is my first attempt and I like it. It's different and used up some fabric from my scrap basket. 

My plan was to make a wreath with strips of fabric like this one. Then I saw these leftover yellow ruffles. They used to be on some giant square pillow shams that I thrifted and cut up for another project. I saved the ruffles because I love the color and print and well, I can't bear to throw something away that could be used for something else! 

That something else turned out to be this wreath. 

I gathered my supplies-- straw wreath, pile of ruffle pieces and a short piece of white ruffle left from a vintage pillowcase. I used some small pins and also some thumbtacks for securing everything. 

1. Iron all fabric pieces. 
2. Start wrapping the ruffle pieces on the wreath, using pin or tack to secure ends. 
3. Continue wrapping, taking care to overlap pieces slightly to cover raw edges of ruffle.
4. Wrap until wreath is covered. You can see I ran out of ruffles and there is a bare spot. No worries-- I have a plan for that!
5. That little extra piece of ruffle comes in handy here. I scrunched it up to look like a flower then pinned it to the wreath.
6. Next, I glued a few buttons on
to finish off the center of the flower. 
7. Last I added an aqua ribbon hanger. The ribbon coordinates with a light blue/aqua in the center of the flowers.
8. Done!

This was super easy-- took longer to post about the wreath than to actually make it. ;-)

I have this hanging in a sunny location outside so, yes, it will fade with time. The great thing is that by removing the pins, it'll be super simple to update with something else. 

Happy Spring! 

Sunday, December 07, 2014

Mending A Tablecloth The Scrappy Way

Last Christmas, a candle burned a hole in my festive tablecloth.
Oops! 

The hole is right in the middle of the tablecloth. Instead of tossing it or making it into something else, I opted to give it a little scrappy makeover by just patching it over. 

I used a few Christmas scraps to cover the hole and make a cute little patchwork thing in the middle. 

I finished the patch off with a scrappy Christmas tree featuring red polka dots and some candy cane stripe-- a combo that never fails to make me happy to look at! 

While not perfect, we love the look this embellishment adds!

One tablecloth saved from uselessness!

Wednesday, June 25, 2014

Refashion: Men's Shirt to a Ruffly Peasant Top

I'm really getting in to refashioning and reviving clothing to make something new and useable.


My latest refashioning project is turning one of my husband's tshirts into a ruffly peasant top for me. 

Usually by the time he gets rid of shirts, they are only fit for the rag bag. This one just didn't fit right and still was in pretty good condition. 

An advantage to this shirt was that it's a nice shade of light blue. Score for me! I snatched that thing right up and hauled it off to the sewing room! 

I used this tutorial that I had pinned a long time ago. It was pretty easy to follow and the shirt didn't take that long to make. 

I can't really tell you exactly how long it took me because I worked on it in small snippets of time--maybe about 1 hour and 15 minutes total? Longer if you count the phone call to my sister to figure out how to do the lettuce hem on my machine!

Before: 

After:

Why go shopping for new clothes when you can make something fun at home?!? 

Wednesday, June 18, 2014

Refashioning: Gaucho Pants To A Skirt


 Before: Pants!

I had two pair of black knit gaucho pants that didn't fit quite right. So I hardly ever wore them.

I've been wanting some new black knit skirts for summer. One day it clicked that I could try turning these pants into skirts. 

If it didn't work I really wouldn't be out anything! 

I used this tutorial as a starting point. But basically all that was needed for this project was to cut the inside seams of the pants open and then sew them back together. Sew the two front sides to each other and then the same thing with the back pieces. (Consult the tutorial for what to with the triangle shape area from the crotch seam which if not cut and sewn straight will make a weird point/bubble in your seam!)


After: A cute skirt!

This is one of those projects that isn't perfect but I love the finished results. Now I have two black knit skirts in my closet which will be so comfy and cool for summer!

Please note: The perspective of these pictures make me look really short and wide! I'm not short and I'm doing my best to not get too wide. LOL!!! It's the direction of the camera, I guess! :-)

Thursday, May 08, 2014

Embellishing A Stained Shirt

One of my shirts got a stain on the front that I couldn't get out after multiple washings. 

I don't know what the spot even was but it does look a lot like snot, doesn't it? 

This shirt was a $1 yard sale find a couple of years back so I could've just tossed it. I really like it though so I decided to try to salvage it. 

It hung in my closet for a while before I finally came up with a cute solution. 

I got a handful of pink crocheted roses for 25 cents at a yard sale last Saturday. When I got home, I realized how cute one of those roses would look sewn onto the shirt to hide the stain. 

It took only a few minutes to sew sone scrap fabric leaves and the rose to the shirt. 

I love the results and I can keep wearing this shirt!  

Frugality and resourcefulness at its finest!

Friday, December 27, 2013

About Those Recycled Storage Jars...

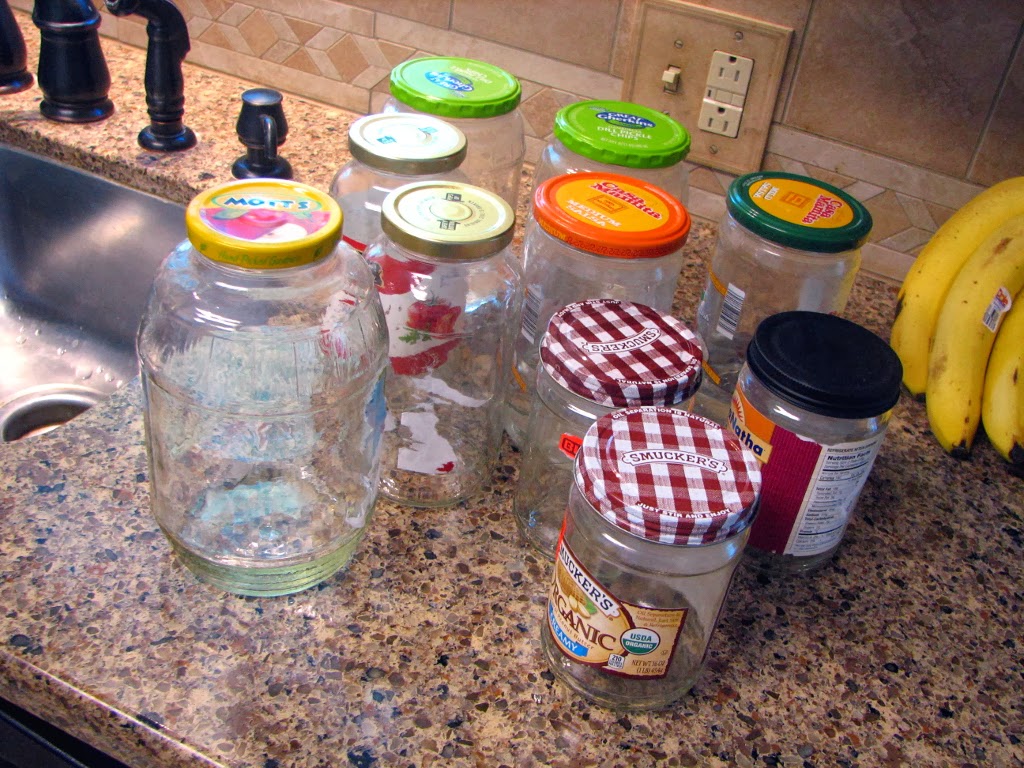
Since I'm in the midst of a two week vacation from work, I finally got around to finishing some of  these recycled jars for craft storage.


One lid was gold and the other painted black so I just left them as they were. Of the four that were left, I painted two of them red and then mod-podged fabric on the other two.

I received these awesome chalkboard labels for Christmas so I put a label on each jar and wrote the contents on the labels with a chalk marker.

To store zippers, I wrapped an old formula can with burlap and tied it with ribbon. Simple and functional!

Cost for project: Free!  Everything was either recycled or something I had on hand and the labels were a gift. 

I'm super pleased with how the jars turned out--much more organized than before too!

Wednesday, November 13, 2013

Curried Green Tomato Sauce


After a frost, I ended up with a collection of green tomatoes from my garden plus a bag full from the children's garden at work. A few turned red after setting out for a few days!

What to do with them?

I finally decided to make Curried Green Tomato Sauce because I had all the ingredients on hand! Plus it sounded interesting.

I just poured the sauce into freezer containers to freeze rather than can.

The sauce is a different type of flavor combination for us. It's tasty though and on the spicy side! We ate it with fish and rice the other night and it was quite good.

I loved making something yummy out of these tomatoes instead of throwing them away!


Wednesday, October 02, 2013

How To Clean Recycled Glass Jars

I've been reorganizing my sewing supplies and wanted to display them in glass jars.

Have you seen the price of cute jars in the store? I have and it's out of my price range--especially for a no spend month.

Lucky for me, I've been saving recycled glass jars for this very purpose for a while. With a little cleaning and paint or fabric on the lids, I'll have cute and free storage jars.

The problem with pickle and salsa jars is that they tend to stink, even after washing. I've been washing them with a baking soda and water mixture according to these instructions. Some of them are really persistent with the smell so I poured some vinegar into those jars and let them set overnight. That seemed to do the trick.

For the labels, I've had the best success with pouring hot vinegar and using citrus (lemon) oil to rub the glue off. It takes a bit but most of it comes off pretty easily. I have a couple very sticky labels that will take more effort.

Hopefully soon, I'll be able to show the finished product!

Tuesday, September 24, 2013

So I Cut My Own Hair

Yes, I did!

I wanted a haircut. We're in the midst of a no-spend month. I had a hair cutting kit that had never been used. Why not use it now? (I didn't use the clippers--just the scissors and comb!)

I followed these instructions. I have a natural side part so I parted my hair on the side in the front and in the middle in the back instead of all in the middle like she instructs. 
 
I was much more excited about this endeavor than my husband but he was willing to photograph the experience for me. And witness my early morning insanity, hoping that it would not be a train wreck!

Me: "If this works, I'll save us at least $15!"
Him: "And if it doesn't, it'll cost us at least $30."
Me: "Pretty much!"

This was all done before my morning shower so no makeup or anything fancy! 

Before:


Parting the hair to divide for cutting:

First cut:


After:
 This looks more lop-sided than in real life! :-)


My thoughts about cutting my own hair:
  • I chose a dry cut because cutting wet hair can result in a shorter cut than intended.
  • This was a simple cut; no layers. Nothing fancy-smancy! Layers, pixies, and bobs would take much more expertise.
  • My hair is more on the wavy/rebellious side. The disadvantage of not having straight hair is that it was more difficult to pull and comb it down straight before cutting. The advantage of wavy hair is that it hides imperfections such as not quite getting it cut evenly since it curls up at the ends.
  • My hair is also very thick. It would be easier to cut in more than two sections next time. Between the waviness and the thickness, it took more  than one snip across to get each section done!
  • One side seems to be a little shorter than the other. This doesn't bother me. I don't think I'm usually still long enough for someone to notice--LOL!!! Furthermore, I figured I'd do more damage if I kept trying to get it even so I just left it at good enough. Plus, it's still long enough to pull back in a pony tail if I decide it looks awful after a few days.
  • The most difficult part was trimming the "V" at the back once both sides were cut. I enlisted my photographer's help for this--he was scared to do it but did just fine!
  • I washed my hair right after my cut and love how it looked after. Bouncy and curly on the ends!
  • I really like my new haircut! I think that it looks very similar  to haircuts I've paid to have done. So I'm happy to have done it myself for free!
I'm certainly not a professional hair stylist and I don't plan to start cutting my friends' hair any time soon. It's nice to know I can give myself a simple cut at home though and with practice I'll probably get better at it!

Do you cut your own hair? Would you like to try?

Friday, February 08, 2013

Freecycle


Do you use Freecycle?

If there's a group in your area, you should join!

Everything posted on Freecycle is completely free. You can offer things you want to get rid of and someone who wants them will respond. You can request items you're looking for. And of course, someone may offer something you want!

We like it, not for just the free stuff, but as a way to give away items we are no longer using.

We have yard sales and donate to thrift stores and then there's stuff we just want to give away to someone who can use it. Or we don't want to haul anywhere. Or we know someone can use it but it's not really something you can donate to the thrift store. That's where Freecycle comes in very handy.

We've given away a lot and received a lot this way. I've listed some of the items to give you an idea.

Received:
  • Crib mattress and sheets.
  • Bag of dog toys.
  • Shipping boxes. 
  • CD player.
  • Bag of men's shorts.
  • DVD recorder.
Given:

  • Dining room table and chairs.
  • Vacuum cleaner.
  • Bag of old jeans and fabric for sewing.
  • Bookcases.
  • Baby food jars and containers.
  • Boxes of clothing. 
  • Computer tower.
  • Moving boxes.
Freecycle is a wonderful way to share....for free! 

**Pictures are from a recent Freecycle haul--- a big bag of dog toys! There were some really great toys included! We took out what Rock can use and will pass the rest on to someone else.

Thursday, January 31, 2013

Quick Tip For Filling Salt and Pepper Shakers

My husband came up with this one:

Put a piece of tape over the holes when filling salt and pepper shakers. This keeps the salt from spilling out!

Super simple but works really well!
 

Friday, January 18, 2013

Putting Scrapbook Paper Scraps To Good Use

What to do with a large pile of scrapbook paper and card stock scraps that rarely get used?

Turn them into scrap paper for notes and shopping lists, "index" cards and Christmas gift tags!

I use index cards for my daily to-do lists. Instead of running out to buy more index cards right away, I'll just use these colorful pieces of card stock instead! In order to minimize waste, the pieces vary in size.

I cut the Christmas papers into gift tags for next year and saved a few bigger pieces for wrapping small gifts.

Other patterned papers were cut into scrap paper for notes and such. If the design is too dark to write on, I'll just flip it over and use the white side. 

The  remaining small scraps are in a bag to use for collages and kid's projects.

I feel good about turning these scraps that I hardly ever use into something useful!

Wednesday, January 16, 2013

Mending

Today I sat down and did some mending.

I sewed a button on some pants and fixed the handle that was coming loose on a tote bag.

I had this shirt I purchased at a thrift store last summer. I really liked the shirt but after wearing it a couple of times, I noticed the neckline was a little lower than I cared for.

Since I'm super high-tech and cool and all--hahahaha--my first thought was to discreetly safety pin the placket together right above the top button so that it wasn't quite so low.

But instead, I remembered there was an extra button on the inside tag so I simply added another buttonhole to the shirt and sewed the button on.

Of course, it took me only a couple of months to get around to this project which took me less than 10 minutes to complete!

I've only known how to make buttonholes for a couple of years now and it is a handy little skill! Although, I don't know if it could be called a skill, since my sewing machine does all the work. But it's a good thing to know how to do.

Sometimes it's tempting to forgo the fixing and mending and just get rid of the item and buy another one. But I feel that a big part of frugality is taking good care of what you do have. If it's worth fixing and repairing, then repair it and keep using it! Doing this helps to slow the buying cycle and saves money in the long run.

Sunday, November 25, 2012

Thanksgiving "Shepherd's" Pie In The Crockpot

Another delicious way to use Thanksgiving leftovers!

I layered a variety of Thanksgiving favorites in the crockpot for our weekly church fellowship potluck today. The result was very good!

Ingredients(varying amounts of each; this is a "use what you have" dish!):


  • Stuffing
  • Chopped turkey
  • Gravy
  • Green bean casserole**--other vegetables can also be used.
  • Mashed potatoes
My gravy was extra thick on Thursday and it always gels up when cold anyways, so I put it in a saucepan and added a little milk.  Then I whisked it while it heated on low until it was nice and smooth. Still a good gravy consistency but not nearly so thick--it stretched a little further this way!

Cold mashed potatoes are usually pretty clumpy too, so I added some milk to those as well and stirred.

To make your Thanksgiving "Shepherd's" Pie, layer in a  greased crockpot:

  1. Stuffing.
  2. Chopped turkey.
  3. About half of gravy.
  4. Green bean casserole** or other veggies. 
  5. Mashed potatoes.
  6. Gravy. 
That's it! Cook on low for about 4 hours.

The layers and flavors all kind of mix together into something very yummy and comforting!  I wasn't sure how it would end up in the crockpot but was very pleased with the result.

**I had mixed feelings about putting Green Bean Casserole in this. But it tasted great--I think the extra flavors from the sauce really helped the whole dish.

Keep in mind that your crockpot should be at least half full to cook properly. I used a 5 quart and added an extra thick layer of mashed potatoes to fill it up more!

Saturday, November 24, 2012

Turkey Dinner Soup

I bookmarked this recipe a while back to make with Thanksgiving leftovers! It's from the cookbook Is It Soup Yet?

If using leftovers, this soup comes together in about 15 minutes. I made it for lunch today and we both really liked it!

Turkey Dinner Soup
Serves 4

2 cups turkey or chicken broth
2 cups leftover cooked vegetables: such as cauliflower, broccoli, carrots, peas, corn, green beans
1 teaspoon dill weed
1/2 teaspoon celery salt (I left this out since I didn't have any.)
1 teaspoon salt
1-2 cups chopped cooked turkey
1 cup mashed potatoes
1/2 cup plus 2 Tablespoons milk
2 Tablespoons flour
4 Tablespoons cooked whole cranberries (optional)

Pour broth into a medium-sized saucepan. Add vegetables, dill weed, celery salt, and salt. Cook vegetables for 10 minutes on medium-high heat until heated up. Add turkey and potatoes. Pour 1/2 cup milk into soup and heat through. Whisk 2 T. flour and 2 T. milk together. Add to soup, stirring well. Serve immediately. Top with a spoonful of cooked cranberries if desired!

Enjoy!

Monday, November 12, 2012

Pumpkin Cooking

Our neighbors gave us 2 big pumpkins a few weeks ago. I used them as outdoor decor for a while and then brought them in to cook before they started to rot.

Pumpkins can be hard to cut when raw, so I followed these instructions on how to cook whole pumpkins in the oven.

Super easy!

I got 12 cups pumpkin puree from the 2 pumpkins. I froze some in 2 cup portions(equivalent to a can of pumpkin) for many baking recipes and some in 3 cup portions which is perfect for pumpkin soup.

Some yummy pumpkin recipes we like:

Pumpkin bread
Pumpkin spice oatmeal (although since going mostly grain-free, I gag at the thought of eating a bowl of oatmeal!)
Pumpkin soup (I add chicken)
Roasted pumpkin seeds
Pumpkin pancakes
Cooked pumpkin with butter and salt & pepper

I'd also like to try this crustless pumpkin pie, although making a regular pumpkin pie recipe without the crust works just fine too!

What's your favorite pumpkin recipe?

Monday, October 15, 2012

Pinned It, Made It: Pajama Pants


For today's Pinned It, Made It Monday, I'm sharing some pj pants I made a few weeks ago.

I'd pinned the instructions for making pj pants by using an old pair of pants for the pattern.

Back in the spring, I'd thrifted a delicious ruffled vintage sheet that was just dying to be made into something sweet! Pajamas seemed to be just the thing.

My husband said as soon as he saw me pull that sheet out, he knew it was going home with us! Smart man!

So anyways, I needed some new pj's and I thought, "Why don't I try making some?" So I did!

The instructions for the pants were very clear and detailed, making them easy to follow. The pants sewed up with very little trouble. I used the ruffled edge of the sheet for the hem of the pants eliminating the need for hemming.

I will say that the fit of these pants is a bit wonky on me. If I were to make these again, I'd need to do some tweaking. I'm not sure sure if the fit issue is the pants I used or the tutorial!

But at any rate, they are still wearable! And I really like them! I think they're super cute and feminine. 

I made a matching top from a Burda Young Fashion pattern. I can't locate the pattern at the moment for the exact pattern number. I've made several things from this pattern--a loan from my sister. I promise I will give the pattern back! Hahaha.

**This post is part of Pinned It, Made It! Monday over at Country Girl At Home. **


Monday, September 17, 2012

Trash

Our new home is county instead of city so we aren't included in city trash pickup. Instead of paying for a private company to get our trash, we've opted to take our trash and recycling to the dump ourselves.

We live only about 5 minutes from the dump so this has worked out quite well so far. Admittedly, it does take a bit more effort to gather all the trash together to take somewhere than setting the can at the curb. 


A few ways we've reduced the trash and made things a bit easier:
  • Composting food scraps. I'd gotten out of the habit of consistently adding to our compost bin. Since moving, we've started this back up. I keep a bowl on the counter and then empty every day. Super easy. I'm also adding some to our garden plot to amend the soil. We have a septic system so no garbage disposal, so if not composting, these things would go right into the trash, not only creating more garbage but a lot more stink!
  • Recycling. The trash and recycling center provides a blue recycling bag. Almost all recyclables can go in this bag eliminating the need for sorting. They accept almost everything except for styrofoam. Recyclables in the trash can tend to fill it up very quickly so this keeps the actual garbage amount down.
  • Outside trash can. I keep a can outside for diapers and other smelly stuff. We normally only have one bag of household trash per week. I'd have to empty it more often if diapers were included so they get their own can plus it gets them out of the house! At the end of the day, I tie up the grocery bag of diapers we've accumulated and cart it outside.
  • Passing stuff on. Egg cartons go to the guy we've been buying eggs from. Another lady at the farmers market uses the plastic clamshell containers to package up her produce. I add those items to our market bag through the week and take it with us to disperse among the appropriate vendors. 
  • Reusing and repurposing. Individual applesauce containers make good little paint cups. There are oodles of uses for toilet paper rolls and cardboard. Glass jars can be reused. So I keep some. Not all. If I kept everything hoping to find a use for it one day, we'd be buried in a sea of recyclables. And we don't want that. I keep a few things if I have a specific use in mind and send the rest to recycling. Super simple.
  • Reducing the use of disposable items. Using plastic or glass containers instead of so many plastic bags, lidded bowls and pans instead of always having to cover with plastic wrap or foil, cloth napkins and rags instead of paper towels and napkins are some of the ways we reduce our trash. We don't do this perfectly by any means but the little things we are able to do add up to savings and less trash! 
By implementing these tips, we typically only have to make a trip to the dump every couple of weeks! 
 

Wednesday, September 05, 2012

Coupons


I'm trying to make a bit more of an effort to use some coupons again for things I know we will use. Using just a few coupons can help to give our grocery budget a little more wiggle room. Plus after not using coupons or shopping the drugstore deals for a while, our grocery and personal care stash is starting to dwindle a bit!

We don't need 20 tubes of toothpaste since we only use 2-3 a year but buying an extra 1 or 2 of needed items as back-up is nice. And when bought on sale, saves us a good deal of cash!

I got a pile of store coupons from the grocery store last weekend so I used some of those on this trip. Most were very general coupons like $1 off any laundry purchase or any oral care purchase. I like coupons like that!

Here's what I got: 

Bi-Lo: 
Mustard- 39 cents with doubled 30 cent manu. coupon.
Canned vegetable- 49 cents with 20 cent e-coupon loaded onto store loyalty card.
Cereal- FREE with $1 store coupon. This will be a good snack for the little ones.
Toothbrush- FREE with $1 store coupon and doubled 75 cent manu. coupon.
Body Wash-FREE with $1 store coupon.


We also had gotten a $3 off any purchase coupon from CVS for my husband's birthday so he kindly gave that to me to use! Upon entering the store, I scanned his Extra Care card and received a $2 off any CVS brand body wash, so I was able to combine the two coupons for a good deal.

CVS:
Body Wash
2 pk. bar soaps
Sale- Buy 1, get 2nd 50% off.
Used $5 in store coupons.
Paid 30 cents for both!


Do you use coupons? What good deals have you gotten recently?