Showing posts with label creativity. Show all posts

Wednesday, May 22, 2019

Mama Sews: Baby Sunbonnet

One of the best things about having  a little girl is that I can now sew all those cute things I've had my eye on for years.

Well...she's 6 months old and I'm just now getting the sewing machine out! This is due partly to my days being full of other things and because up to now, she really hasn't needed a lot of extras. She's received so many wonderful gifts since the day she arrived!

With summer being here in the South and the sun so bright and HOT, Ilona needed a hat or bonnet to shade her face. I'd had this bonnet tutorial from Purl Soho pinned on one of my Pinterest boards for a LONG time. Now was the time to try it!

I used some white dotted Swiss fabric for this first try. I printed out the pattern, cut everything out and had it sewed up in about an hour! Not bad for a Friday night sewing project.

I was a little unsure about how it would turn out with this being my first try at sewing head wear. But it was really easy and the instructions very clear.

Note: Definitely follow their advice and use tons of pins when sewing  the curved seams!

It really does make it easier to work with.

I used the 6-12 month size and it fits Ilona but is on the big side. I knew 3-6 would probably be the right size but wanted something she could grow into and wear a little longer. I may go back and make a 3-6 bonnet now that I know how fast it is to make!

A baby in a bonnet...oh so sweet!

I now am itching to get more things sewn up for her. Such small sizes sew up so fast and are so much fun!

Wednesday, May 15, 2019

Mother's Day

I greatly enjoyed my first Mother's Day! I'm blessed to have so many thoughtful friends and family members who remembered me on this day by sending messages, cards and happy wishes in person.

To be honest, I hadn't given much thought to being celebrated on Mother's day so I was a bit surprised when my sweet mother-in-law handed me a card when they were visiting and said, "This is a little early!"

I thought, "My birthday isn't until July!" haha

Andy created a special card for me then took me out for brunch after church with some friends. We tried a new-to-us restaurant that serves breakfast and lunch. It was wonderful!

I sent Mother's Day cards to our moms and included a special gift from Ilona. We did footprint hearts for Valentines Day so I thought we'd make hand print flowers this time. Turns out the footprints were easier (at least then). She kept her hands balled up so I had to pry them loose to get prints. ;-)

They are wonky but delightfully so! I chose the best ones and went with it. She is only 5 months old once. Perfection is way overrated--these hand prints show real life! Little hands that do what they want to!

We made 4--one for each grandmother, one to send to her birth mother and I kept one for myself to put in her baby book.

Over the years, while sometimes there was a bit of sadness associated with Mother's Day, for the most part it hasn't really been the hardest day for me. One reason is that years ago, I read that the reason Mother's Day was established was to honor and celebrate one's mother. Everyone has or has had a mother. Maybe it isn't a great relationship but still everyone has a mother. This helped me to think about my mother and mother figures in my life instead of myself. When I did childcare in my home, some of the parents would give Mother's day gifts to me and that was always so sweet of them.

I hope all of you moms/mother figures had a wonderful Mother's Day!

**Flowers in jars are left from Ilona's adoption celebration. We have enjoyed them for nearly 2 weeks!

Friday, February 08, 2019

Baby Gets A New Hat

The Story of The Three Hats
As told by Baby Girl


 Once upon a time, Mommy thought I needed a hat. I had a hand knitted hat from when I was first born.


But this hat was too small. 

My Grammy bought me a hat.


But this hat was too big!

My mommy decided to make me a hat and printed off this pattern. But before she could sew it up, my Auntie sent me a package all the way from Washington State. In it was a pink hat.

And this hat was just right! 

And quite beautiful too, I might add. 


Mommy was happy and crossed making a hat off her monthly to-do list. And now my head is warm when we go out in the cold weather.

Thank you, Auntie!

The end.  

P.S.- My Auntie did not make this hat. She got it from the thrift store but it looks brand-new! My mommy loves thrifted items and apparently, I do too now!


Thursday, January 28, 2016

Handmade Christmas: Kitty Bags

These kitty bags are the only handmade Christmas gifts that I made last year. But totally worth the time creating.

Due to my grandmother's passing in early December and that I was able to fly to Oregon for the funeral, my schedule for getting gifts finished and sent out got pushed back quite a bit. Thus I ended up spending a late night creating these bags the week of Christmas! 

A little background: Our two youngest nieces ( ages 6 and 11) love cats. I mean, really LOVE cats. I pinned these cat coasters a while back as inspiration for creating a bag or something for the girls. 

Side note: Many of my Pinterest pins are ideas or inspiration for something else, not just because I want to make an identical item. Although sometimes I do! 

Back in early 2015, I found a 2 pack of kitty knee socks on super clearance at Kohl's. I knew the nieces would love them. Sadly, I could only find one pack of  the socks. They wear the same size so I divided the package up with one pair for each girl. I also found in my gift drawer some Hello Kitty pencils and a cat hair clip I'd bought at a craft fair. I had a few other small items as well. 

All these items brought inspiration for a kitty-themed gift! 

I decided to make kitty bags to hold all the loot. I used some thrifted linen-ish fabric for the front of the bag and added lots of colorful scraps for the rest. Everything was from my stash and I just picked things out and used them as I went, no real pre-planning involved! I used the idea from the cat coaster tutorial  and just enlarged and then did the rest accordingly.

The backs of the bags were super fun to make. I created a patchwork design as I went. All the prints made me happy! 


The handles turned out extra long; my plan was long enough to be used as a crossbody bag. They were a little long for a child but can be tied in a knot at the shoulder to adjust a bit. 

Anyways, just wanted to share some handmade creative fun! This was a fun gift to make! And the girls liked them too.

Thursday, May 07, 2015

Use What You Have Zipper Pouches


I had this rather large piece of vintage-y quilted fabric in my stash. It came in a bargain bag of scraps from a yard sale a few years ago. 

Anyways, I've been trying to make use of what I have instead of buying more. Partly to save money but mostly because it means less to move around when my sewing room becomes a nursery. 

This fabric was already sewn into something and taken apart so this is not it's first party. Ha! It's a little worn in spots but perfect for these zipper pouches. 

I often need some pouches for storing items when traveling. I made one large enough to carry my hair straightener and then the second one ended up a little smaller because of the size of the fabric. 

I had some red gingham ruffle in my scrap bucket pile. I think it was given to me in a box of fabric?? 

Anyways, I liked it with the sweet strawberry fabric so I sewed some ruffles on the pouches. 

Even the zippers were repurposed from some old lingerie bags!!! 

So yay for a quick evening project that cost nothing to make but is cute and super useful! 
 I still have some small pieces of this fabric left--will have to see what I can make with them!


Wednesday, April 15, 2015

"Use What You Have" Spring Wreath

I've been wanting to make a wreath for our kitchen door. Something springy!

We had a yard sale last weekend and a couple straw wreaths were left. (They were donated by a friend.) So instead of donating them at the end of the sale, I decided to make some simple wreaths for our home. 

This one is my first attempt and I like it. It's different and used up some fabric from my scrap basket. 

My plan was to make a wreath with strips of fabric like this one. Then I saw these leftover yellow ruffles. They used to be on some giant square pillow shams that I thrifted and cut up for another project. I saved the ruffles because I love the color and print and well, I can't bear to throw something away that could be used for something else! 

That something else turned out to be this wreath. 

I gathered my supplies-- straw wreath, pile of ruffle pieces and a short piece of white ruffle left from a vintage pillowcase. I used some small pins and also some thumbtacks for securing everything. 

1. Iron all fabric pieces. 
2. Start wrapping the ruffle pieces on the wreath, using pin or tack to secure ends. 
3. Continue wrapping, taking care to overlap pieces slightly to cover raw edges of ruffle.
4. Wrap until wreath is covered. You can see I ran out of ruffles and there is a bare spot. No worries-- I have a plan for that!
5. That little extra piece of ruffle comes in handy here. I scrunched it up to look like a flower then pinned it to the wreath.
6. Next, I glued a few buttons on
to finish off the center of the flower. 
7. Last I added an aqua ribbon hanger. The ribbon coordinates with a light blue/aqua in the center of the flowers.
8. Done!

This was super easy-- took longer to post about the wreath than to actually make it. ;-)

I have this hanging in a sunny location outside so, yes, it will fade with time. The great thing is that by removing the pins, it'll be super simple to update with something else. 

Happy Spring! 

Sunday, December 07, 2014

Mending A Tablecloth The Scrappy Way

Last Christmas, a candle burned a hole in my festive tablecloth.
Oops! 

The hole is right in the middle of the tablecloth. Instead of tossing it or making it into something else, I opted to give it a little scrappy makeover by just patching it over. 

I used a few Christmas scraps to cover the hole and make a cute little patchwork thing in the middle. 

I finished the patch off with a scrappy Christmas tree featuring red polka dots and some candy cane stripe-- a combo that never fails to make me happy to look at! 

While not perfect, we love the look this embellishment adds!

One tablecloth saved from uselessness!

Wednesday, June 25, 2014

Refashion: Men's Shirt to a Ruffly Peasant Top

I'm really getting in to refashioning and reviving clothing to make something new and useable.


My latest refashioning project is turning one of my husband's tshirts into a ruffly peasant top for me. 

Usually by the time he gets rid of shirts, they are only fit for the rag bag. This one just didn't fit right and still was in pretty good condition. 

An advantage to this shirt was that it's a nice shade of light blue. Score for me! I snatched that thing right up and hauled it off to the sewing room! 

I used this tutorial that I had pinned a long time ago. It was pretty easy to follow and the shirt didn't take that long to make. 

I can't really tell you exactly how long it took me because I worked on it in small snippets of time--maybe about 1 hour and 15 minutes total? Longer if you count the phone call to my sister to figure out how to do the lettuce hem on my machine!

Before: 

After:

Why go shopping for new clothes when you can make something fun at home?!? 

Wednesday, June 18, 2014

Refashioning: Gaucho Pants To A Skirt


 Before: Pants!

I had two pair of black knit gaucho pants that didn't fit quite right. So I hardly ever wore them.

I've been wanting some new black knit skirts for summer. One day it clicked that I could try turning these pants into skirts. 

If it didn't work I really wouldn't be out anything! 

I used this tutorial as a starting point. But basically all that was needed for this project was to cut the inside seams of the pants open and then sew them back together. Sew the two front sides to each other and then the same thing with the back pieces. (Consult the tutorial for what to with the triangle shape area from the crotch seam which if not cut and sewn straight will make a weird point/bubble in your seam!)


After: A cute skirt!

This is one of those projects that isn't perfect but I love the finished results. Now I have two black knit skirts in my closet which will be so comfy and cool for summer!

Please note: The perspective of these pictures make me look really short and wide! I'm not short and I'm doing my best to not get too wide. LOL!!! It's the direction of the camera, I guess! :-)

Friday, May 30, 2014

An Awesome Alterations Website

A friend brought this bridesmaid dress over on Wednesday. The shoulder strap needed to be taken up a couple of inches since the bodice was way too loose and gaping open. 

I had never attempted something like this and would've said 'no' to the request but my friend was desperate and the wedding is this Saturday! She also said she didn't care how it ended up; just so it fit! I took pity on her plight this time!

The bodice was of course fully lined requiring a lot more than just adjusting a strap! 

A quick Google search led me to this awesome tutorial at Sew For Dough. While the strap I was shortening was constructed a bit differently than the one featured in the tutorial, it was easy to follow and helped me tremendously! 

I couldn't figure out how to sew the side seams of the shoulder back together on the machine so I handstitched that part.  It ended up a little puckered on the underside but the front looks good.

Anyways, my main point of this post is to direct you to Sew for Dough if you need help with alterations. She has tons of detailed tutorials for just about any alteration project you might need to do! Lots of helpful hints for mending and knowing how to price your services if alterations are your thing and you'd like to turn it into a business too. 

I definitely prefer constructing new garments to doing alterations. We've taken Andy's suit jackets and pants to a local shop for alterations; I consider it money well-spent! But it's also nice to know how to do some myself if needed!

What about you? Do you alter everything yourself or pay for someone else to do it for you?

Friday, December 27, 2013

About Those Recycled Storage Jars...

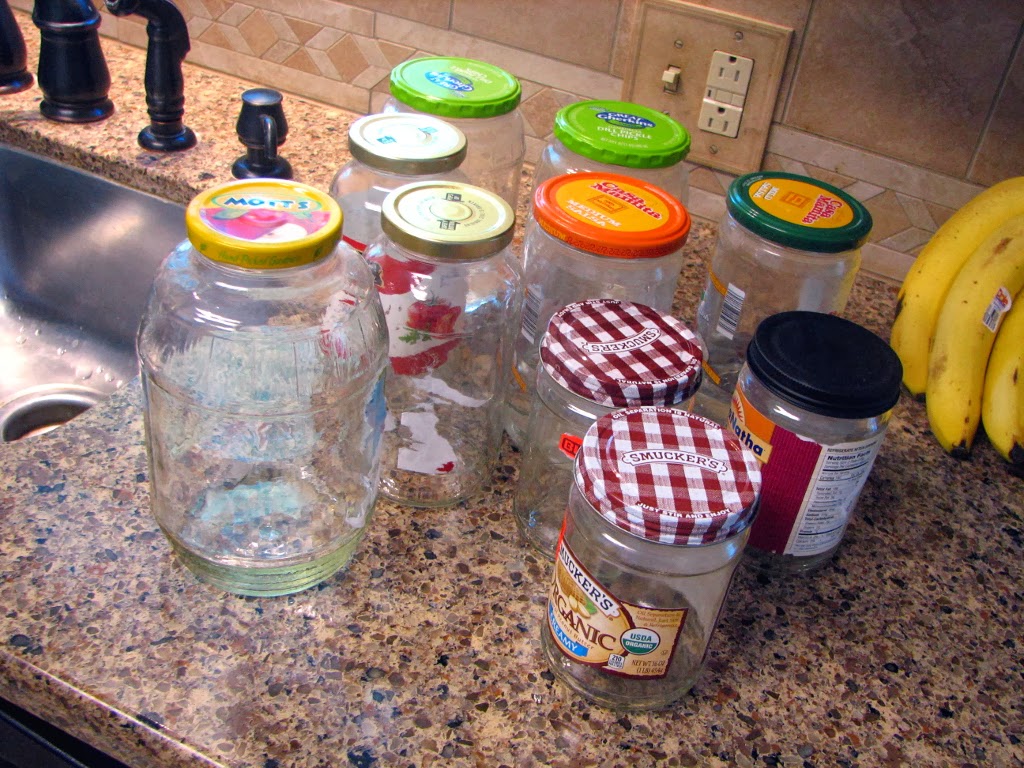
Since I'm in the midst of a two week vacation from work, I finally got around to finishing some of  these recycled jars for craft storage.


One lid was gold and the other painted black so I just left them as they were. Of the four that were left, I painted two of them red and then mod-podged fabric on the other two.

I received these awesome chalkboard labels for Christmas so I put a label on each jar and wrote the contents on the labels with a chalk marker.

To store zippers, I wrapped an old formula can with burlap and tied it with ribbon. Simple and functional!

Cost for project: Free!  Everything was either recycled or something I had on hand and the labels were a gift. 

I'm super pleased with how the jars turned out--much more organized than before too!

Wednesday, October 02, 2013

How To Clean Recycled Glass Jars

I've been reorganizing my sewing supplies and wanted to display them in glass jars.

Have you seen the price of cute jars in the store? I have and it's out of my price range--especially for a no spend month.

Lucky for me, I've been saving recycled glass jars for this very purpose for a while. With a little cleaning and paint or fabric on the lids, I'll have cute and free storage jars.

The problem with pickle and salsa jars is that they tend to stink, even after washing. I've been washing them with a baking soda and water mixture according to these instructions. Some of them are really persistent with the smell so I poured some vinegar into those jars and let them set overnight. That seemed to do the trick.

For the labels, I've had the best success with pouring hot vinegar and using citrus (lemon) oil to rub the glue off. It takes a bit but most of it comes off pretty easily. I have a couple very sticky labels that will take more effort.

Hopefully soon, I'll be able to show the finished product!

Friday, August 09, 2013

Scrap Buster: Pennant Cards

I opted out of my weekly farmer's market trip last night. We're pretty set on veggies and I wanted to spend a little time at home by myself working on a creative project!

I don't know about you, but even though I love sewing and creating is part of who I am, it's difficult for me to carve out a little time and then to start something. There's always other work to be done and by the time I can sit down to work on something, I'm exhausted and just want to sleep!

So this time, I made myself use the time creatively. I quickly cleaned the bathrooms then sat down for a little crafty fun until my husband returned home!


I saw these cute pennant cards the other day so had decided I wanted to make some! I had cards and of course, plenty of scraps!

These cards are what I call "imperfectly perfect". I didn't make a pattern to trace for identical triangles nor did I measure anything. I just cut and arranged to my heart's content!

There was a time when I would've been more worried about getting everything just right. It's incredibly freeing to just create for the sake of creating! And enjoy the result!

One card got a couple black smudges on it and I cut a little heart and just stitched it on over the mark on the front.

I finished the cards off with stamping some words for birthdays, congratulations, and a thank you!

I have recipients in mind for several of these but am planning to make some more of these for my gift drawer because wouldn't a little stack of these cards make a cute gift?

Wednesday, July 24, 2013

More Pillowcase Bags


I finally got around to making up some of these easy tote bags made from pillowcases!

I'm a sucker for vintage linens or any linens I think are pretty so I had accumulated a small stack from yard sales and thrift stores. What I love most about these bags is that there is no waste or scraps leftover. The whole pillowcase is used and there's very minimal cutting! A good project for beginners or for trimming down your stash.

I had some spare time one night while waiting for dinner to finish cooking so I sat down and whipped up a pillowcase bag.

It turned out so cute and was so easy--much cuter than this one--so the next day I sewed up three more during nap time.

One was a king-sized pillowcase--it made a more squarish bag. The regular pillowcases make a more rectangle-shaped bag. 

I plan to keep two of these for myself and put the other two aside in my gift stash!

I've already used mine for groceries, library books and the pool and they worked great!

Monday, April 29, 2013

Pinned It, Made It: Polka Dot Notebook Cover

I use a plain notebook to record my insights as I read God's Word each day. I've been wanting something a bit more cute and from time to time I've purchased cuter notebooks.

But since I use one page per day, you can imagine how quickly I go through notebooks! So a reusable cute cover fits the bill perfectly!

I had pinned this cute and easy notebook cover from Blissfully Content. One evening when the house was quiet, I got out my fabric and ribbon and went to work.

I chose this happy red polka dot fabric from IKEA. I smile just to look at it! If you hang around here long enough, you'll notice how much I like red!

Red is my happy color.

Anyways, this project was pretty fast--completed in under an hour minus the flower. I had a little trouble getting it the right fit for the notebook but with a little seam ripping and resewing, it fit very well!:)

I preferred this flower to the one in the notebook cover tutorial, so that's what I used. Mine doesn't look quite the same since I glanced over the instructions and then started creating and "winging it" as I went.

My sister had given me some red and white polka dot scraps which I used for the flower! I made the flower into a pin so I could remove it if I wanted to and use it somewhere else! It turned out a bit lopsided but thankfully, scissors are very handy for trimming!

I'm very happy with how it turned out and the polka dots make me smile each morning when I reach for my Bible and notebook!

**This post is part of Pinned It, Made It Monday hosted by Country Girl At Home. **


Thursday, March 14, 2013

Vintage Laundry Art


A few years ago, I got an embroidered vintage laundry bag from my mother-in-law. It was during a time that both her parents and aunt were seriously downsizing and this was in a pile of various things she wanted me to go through.

Of course, this hand-embroidered piece immediately caught my eye! I loved it right away. Her headscarf, the apron, the tiny embroidered clothespins....

We don't know who made it  and I'm not sure if the bag was ever technically finished since there were no drawstrings or anything at the top. And there are a few stains but nothing terrible.

My laundry room is rather dark--hope to lighten it up with paint one day. When we moved into our house, I hung this laundry bag in there for a bit of decoration. I hung it with two thumbtacks for a quick fix but I knew I wanted to do something nicer with it-I just didn't know what yet.

Last week, I had the thought to stretch it over a canvas. So next time I was at Hobby Lobby, I got a 16 x20 canvas. (A 2-pack is $7.99 plus I was able to use a 40% off coupon!)

I cut into the backing on the bag so it would fit the canvas on all sides and used thumbtacks to attach it.

Seriously--that's it! I don't know that this can technically be called a craft project!

It's simple but I really like my one-of-a-kind art piece!