Showing posts with label gardening and preserving. Show all posts

Tuesday, October 25, 2016

Applesauce Week

Last week was quiet in this space as I was spending my mornings making applesauce!

We made a quick trip to the mountains the weekend before and purchased 4 bushels of apples. 

In years past, I've calculated that one bushel of apples yields approximately 13 quart of applesauce. We go through 40-50 quart in a year's time. So 4 bushels of apples= 52 quart. Seemed simple. Some years I purchase 5 bushel of apples because I also make several batches of apple butter. But we still have plenty of apple butter on the shelf so I was just planning to make applesauce this year.

Well...I got a new sauce maker this year ( Yay for birthday and Christmas money!) and it is so much more efficient, cranking out the applesauce much more quickly. Plus I don't have to core the apples; just wash, quarter and cut off any bad spots. 

I did 1 bushel of apples each morning. The first day I was pleasantly surprised to end up with 20 quart of applesauce from just 1 bushel! The next 2 bushels yielded 21 quart each. 

The applesauce with the new sauce maker is a bit finer consistency and a little thinner but I'm good with that! 

Needless to say, 3 bushels gave us 62 quart of applesauce (60 quart canned) so  we should be good to go for the next year and possibly longer than that since it keeps longer than 1 year and I still have a few jars of applesauce left from last year! 

So since the 4th bushel doesn't need to be made into applesauce to can, we've been eating apples fresh, I'll make a batch of applesauce to eat fresh plus some apple pies to freeze. I may even make a few other fun things with them! 

We thank God for His bountiful provision!

For past apple sauce making posts:

Wednesday, February 11, 2015

Lasagna Gardening, Take 1

Saturday was a beautiful sunny day, perfect for working in our garden!

I've been interested in lasagna gardening for several years. Lasagna gardening is a no dig, no till method of gardening. Instead of digging and tilling dirt, one makes layers of peat moss and other soil enriching components. Basically, you can take a hard piece of ground, put newspapers down to kill the existing grass/weeds, then layer the other stuff on top--within months you will have a lovely rich soil to plant in.

Andy gave me the book Lasagna Gardening for my birthday last year. So I've been itching to get started!

We started with our existing garden plot which has wonderful soil but lots of aggressive weeds.

First step is to soak newspapers and then put thick pads of them all over the soil. I had Andy's parents save newspapers for me and also got a big box of them from a lady via Freecycle.


 The second step was to pour a layer of peat moss down. I sectioned the garden into quarters and used cardboard to mark off a path.  Looks like a cross, doesn't it? I had to make another trip to Farmer's Exchange to pick up an additional bale of peat moss. By the time this is done, we'll be on first name basis. ;-)
Next, I made layers of compost, grass clippings and a sprinkling of bonemeal--all stuff we had already. No picture of these layers, because....ewww! Not all my compost is fully decomposed. I covered this with a thick layer of straw. I only used about 1/2 a bale so straw is a cost effective addition to the lasagna garden at only $5 a bale.

The garden is smelling lovely at this point...

 I started putting mulch that we already had on hand over the path area to make it look nicer. Apparently, I didn't get a picture of that...

Done for today with layering. Last step is to cover everything with black plastic and secure it. Not only will covering it help the layers to "cook" and decompose, it will also help to deter a very nosy dog who finds compost and bonemeal to be quite delightful.;-)

I'll be adding more layers in the coming weeks--more peat moss, compost, straw, etc.

Stay tuned for more adventures in Lasagna gardening!

This is our first time using this method so if you have experience with this, please share!

And my sincere apologies to my readers who are covered in snow...;-)

Tuesday, June 03, 2014

First Canning of the Season

I made a quick stop at the produce stand yesterday morning and spotted some boxes of very ripe tomatoes for $5.00  a box.

I bought two boxes as they were perfect for canning. One box weighed approximately 33 pounds so I'm estimating that I had about 65 pounds total. 
I had to wait to start canning until after work in the evening so once dinner was over, I got started. 

Even though canning plain tomatoes in their own juice is very easy, it still takes a block of time to complete. I really wanted to get both boxes canned in one evening even with knowing I would be up really late! 

So I plowed through and the last canner full was done at 12:30 am. Thankfully, I had already had time to clean up the kitchen, start the dishwasher and put a load of laundry in the washer, so I just took the jars out of the canner and went to bed! 

Final count was 25 quart of canned tomatoes-- not too bad for $10!
 

Wednesday, November 13, 2013

McAbees' Apples


McAbees' Fruit Stand near Hendersonville, NC is our favorite place to stop to buy apples if we happen to head to the mountains in the fall. 

They are located right off I-26 in Flat Rock and can be seen from the interstate. It's a very convenient stop for travelers. 

According to the people at the stand, they should have apples to sell through the winter, until April, I think they said!  
They have a big variety of apples. My favorite thing here is the shelves at the back of the stand that are filled with 1/2 bushel bags of seconds for only $5 a bag. Seconds are typically smaller than first quality and are likely to have some bruising. That is what I usually buy for applesauce and apple butter since it really doesn't matter what they look like because I'm going to cook and smoosh them anyways.    
But first quality apples are still only $8 for a 1/2 bushel so still a great deal in my opinion! 

We filled the van up with apples when we stopped there this year. 

Yum! Homemade applesauce to eat all year long! 

Curried Green Tomato Sauce


After a frost, I ended up with a collection of green tomatoes from my garden plus a bag full from the children's garden at work. A few turned red after setting out for a few days!

What to do with them?

I finally decided to make Curried Green Tomato Sauce because I had all the ingredients on hand! Plus it sounded interesting.

I just poured the sauce into freezer containers to freeze rather than can.

The sauce is a different type of flavor combination for us. It's tasty though and on the spicy side! We ate it with fish and rice the other night and it was quite good.

I loved making something yummy out of these tomatoes instead of throwing them away!


Tuesday, November 12, 2013

Apples and Sewing

We stopped in Hendersonville, NC and bought five bushels (10-1/2 bushel bags) of apples on our way home from Pigeon Forge. So my evenings have been spent doing apples. My goal has been to do a 1/2 bushel (1 bag) most evenings and so far it's working well. I'm sure there are faster ways to accomplish this but this goal is attainable and not too overwhelming. 8 bags down, 2 to go!

I've been making applesauce, apple butter, dried apples and will also freeze some apples for pies and apple crisps. I think I'm done with apple sauce now; I have over 40 quart. We love homemade applesauce and eat a lot of it!

I've spent an hour or two each morning working on a big Etsy order--5 of these Christmas gift sets. They are packed and ready to ship off today-- I didn't get a picture of them before I boxed them up. But my sewing room looks like this...

Etsy by day; apples by night!

Housework beyond clean dishes, laundry and cooking hasn't been my top priority during this season as you can see. I'll get back to it soon! Starting to drive me a bit crazy as I really like things in order.

Our fall seasons are always jam-packed and super busy. This year is no exception!

What have you been up to?

Wednesday, August 28, 2013

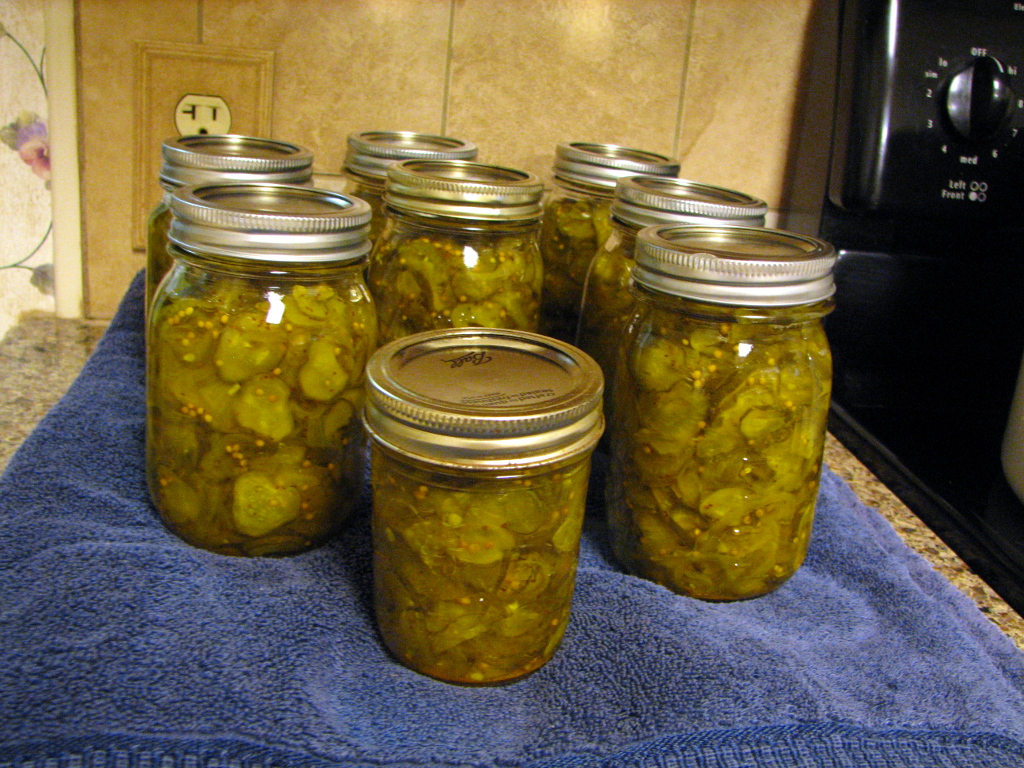
Bread and Butter Pickles

We love bread and butter pickles! The homemade ones are so much better than what we get at the store.

This recipe is from my Mom although a very similar one is in my Ball canning book.

Pickles are a fairly easy food to can or "put up" as the old-timers call it. These do require a standing time of 3 hours before finishing the cooking and canning process so plan your day accordingly!

The pickles and onions need to be sliced pretty thin. I use the slicing blade on my food processor to do this and it only takes a few minutes!

Bread and Butter Pickles
Makes about 8 pints.

16 cups (4 quarts) sliced unpeeled cucumbers-the small ones are best for pickles.
6 cups sliced white onions
3 cloves garlic, minced
1/3 cup salt (non-iodized, canning and pickling salt)
5 cups sugar
3 cups white vinegar
1 1/2 teaspoon turmeric
1 1/2 teaspoon celery seed
2 Tablespoons mustard seed

Combine cucumber, onion and garlic in large bowl. Add salt and mix. Cover with ice and mix thoroughly. Let stand for 3 hours.


After 3 hours are up, drain well. DO NOT RINSE!

Combine remaining ingredients (sugar, vinegar and spices) in  a large pot. (I use a 6 quart and it is big enough for everything.) Add cucumber mixture and bring to a boil, stirring often.

Fill hot jars to 1/2 inch from the top. Adjust lids.

Carefully put jars in boiling water canner. After water comes back to a boil, process jars for 5-10 minutes.

Let cool in canner for a few minutes then remove from canner and place on towels on counter to cool completely.

Let cure for 6 weeks or so before opening to enjoy.

Jars of bread and butter pickles make wonderful Christmas gifts!

Monday, August 26, 2013

Refrigerator Pickles

Andy's mom makes these pickles and shared the recipe with me. They're easy to make and very yummy!

These are refrigerator pickles so no canning is needed. Just fill the jars as instructed and put in the fridge for a few days before opening to eat.

Refrigerator Pickles

Bring to boil in saucepan:
  •  1/2 cup white vinegar
  • 1 1/2 cups cold water
  • 1 1/2 Tablespoons sea salt
Add:
  • 1 clove garlic, minced
  • Some dill, either fresh or dried
Pour over thinly sliced cucumbers in jars. Let cool.

Refrigerate several days before eating.

**Vinegar mixture makes enough for 1 quart jar. Any size jar can be used.
**Pickles stay good in the fridge for a while.

Enjoy!

Thursday, August 22, 2013

Cucumbers and Pickles

A friend gave me a huge bag of pickling cucumbers.

Enough for a batch of bread and butter pickles...

Two quart jars of refrigerator pickles...

And a bowl of cucumber salad!

The cucumbers in our garden are done for the season so I was happy for this gift!

**Pickle recipes coming soon!

Friday, June 21, 2013

2013 Garden

Here are some pictures of our 2013 garden.

I've been super slow in getting everything in the ground and then taking care of it but it seems to be thriving anyways!

My garden plot isn't picturesque--it's the "raised" garden bed that was here when we moved in; it had been neglected for a long time and the boards around the garden are pretty much rotted out. We don't have the time or energy--or expertise-- at the moment to replace it so we just used what we had and have been planting there as is. We did enlarge the garden space by about 3 feet in the front and 5 feet on the side. So some is level with the ground and some is raised!

Fortunately, our soil is very good--nice and brown instead of Carolina red clay! This is a blessing! 

I've gathered a little gardening experience over the years by planting a few things in flowerbeds and pots but I'm still learning as I go. I'm trying to remember to take notes as I go along so I can remember the details and learn from my mistakes and successes.

There are no weeds in the garden of my dreams...but this is reality. So you will see some weeds in these pictures. I try, I really do! :-)


Green beans almost ready to pick!
Pepper and onions.

Zucchini. We've picked three nice ones so far. Cucumbers are producing well too.
I have basil growing on the deck in containers. We had a couple Rubbermaid totes without lids so we drilled holes and made planters! I have dill in one but it's not looking so good at the moment. The basil is doing great! I've made this awesome Creamy Basil and Avocado Dip and have the ingredients to make some pesto.

Other things growing that are not captured in these close-up shots: tomatoes, cucumbers, pumpkins, more onions in planters, Swiss chard and of course, our mystery plants.

How is your garden growing? 


Thursday, June 20, 2013

Mystery Plants

A few weeks ago, I discovered a sizable zucchini/cucumber type plant in the garden row where I didn't plant anything.  The leaves were slightly different than my other plants of these types so eventually I determined that this must be a weed and pulled it out.

Well, imagine my surprise today when out of my bean rows, I saw three more of these vines growing happily. And these guys have blossoms!
Hmmm...I'm curious as to what they are and how they got there--perhaps from kitchen scraps I've used as compost?

A quick google search on various viney type plants tells me maybe  acorn squash or canteloupe?

Definitely leaving these in the garden and can't wait to see what they turn out to be!

Do you have any ideas what these vines may be?

Wednesday, April 24, 2013

Flowers For Mom

Since this is our first spring in our new house, it's been fun to see what is blooming around the yard!

My mom asked to see some pictures of the flowers so these are for her...and for you! Enjoy!

**These were taken a few weeks ago; there have been a  few changes since then--more irises, more colors of tulips, more azaleas. Also, I've done very little work in the flowerbeds yet this spring so focus on the flowers and not the state of the beds themselves! :-) **


Monday, November 19, 2012

Broccoli

This head of broccoli was picked from my fall garden today.

I planted 6 broccoli plants and now all 6 have broccoli heads growing. Most are still very small--this big guy was the first!

We watched him grow for quite a while and finally decided he was big enough to cut.

I'm super excited about my success with broccoli. I've been a rather negligent gardener this season... Broccoli will certainly be on my list to grow again in late winter/early spring. 

I planted broccoli and cabbage plants for my inaugural fall garden and so far, so good. I planted green bean seeds too, but none of them came up.

It would be fun to serve broccoli from our garden at our Thanksgiving dinner!

Monday, November 12, 2012

Pumpkin Cooking

Our neighbors gave us 2 big pumpkins a few weeks ago. I used them as outdoor decor for a while and then brought them in to cook before they started to rot.

Pumpkins can be hard to cut when raw, so I followed these instructions on how to cook whole pumpkins in the oven.

Super easy!

I got 12 cups pumpkin puree from the 2 pumpkins. I froze some in 2 cup portions(equivalent to a can of pumpkin) for many baking recipes and some in 3 cup portions which is perfect for pumpkin soup.

Some yummy pumpkin recipes we like:

Pumpkin bread
Pumpkin spice oatmeal (although since going mostly grain-free, I gag at the thought of eating a bowl of oatmeal!)
Pumpkin soup (I add chicken)
Roasted pumpkin seeds
Pumpkin pancakes
Cooked pumpkin with butter and salt & pepper

I'd also like to try this crustless pumpkin pie, although making a regular pumpkin pie recipe without the crust works just fine too!

What's your favorite pumpkin recipe?

Friday, August 10, 2012

Roses


We inherited a number of flowerbeds and lots of yard work when we bought this house.

This was one of the downsides to this place since we really are not yard work or even really outdoorsy type of people.

However, the pros outweighed the cons and we decided to go for it--yard work and all.

I've been working on the flowerbeds one at a time. I'm beginning in the backyard--a) because I'm back there a lot with the children and see the flowerbeds all the time and b) I can work a little bit while the children are playing. 

My first stop was at the bed of roses in the backyard and I must admit that it felt really worthwhile to clean this bed up and see it look a little better. Maybe I'll grow to like working in the yard after all! (Ok, so it's not perfect looking but a huge improvement from where it was!)


My mom was excited to hear that I had a couple of rose beds and gave me some tips to promote healthy growth.

  • Don't let dead leaves and debris lie on the ground around your roses.
  • Remove faded roses--if they're in a cluster, clip out the bad ones. One to a stem--go down to the first 5-sectioned leaf. Clip right above it.
  • Prune roses back sometime from December to February. Cut out all dead canes. She recommends cutting back to about 6 inches.
  • Use a good fertilizer for roses if needed.
She also gave me a recipe for a homemade spray for roses:

"Mix 2 tablespoons baking soda with 1 gallon warm water, then add 1 teaspoon liquid dish soap and 1 teaspoon vegetable oil. Spray under the leaves and on top of the leaves after watering or a rain at least once a  week."

I haven't tried the spray yet but plan to make it as soon as I get a sprayer for it.

My mom is very good at gardening so I'm excited to follow her instructions and see how the roses do!

Do you have any gardening tips for roses to share with me? 


Saturday, May 28, 2011

Farmer's Market Saturday

Summer produce is just now starting to come into season here in the South and the farmer's market season has now begun.

I like to kill two birds with one stone on Saturday mornings if I can and combine our morning walk with a stop for produce.

The market I go to is still fairly small on Saturday mornings and this morning only had one produce vendor but look at what I brought home!

*Head of cabbage
*Three zucchini
*One beet- Looking forward to trying a new beet salad recipe next week!
*One onion
*Basket of cherry tomatoes- the first of the season!

Note to self: Head of cabbage + water bottle = very heavy backpack for the trek home.

Thursday, March 24, 2011

Grass Is Growing


My wheat grass is growing! I tried this a few years ago and for whatever reason, it just didn't grow. But this time it is.


I really like having something green in my house. A touch of spring!


Friends have asked why I am growing grass in pots? Just for fun. And I think it's pretty. Not planning on juicing it or anything anytime soon.:-)