Showing posts with label health and nutrition. Show all posts

Thursday, December 01, 2016

My Healthy Goal For December

Every December, I try to make an effort to prepare more simple and nutritious meals to offset the extra candy, cookies and junk (albeit yummy junk!), we inevitably consume during the holiday season.

Recently, I've noticed some health issues that I've been having. After doing some research, I've concluded that these symptoms could very likely be due to not drinking enough water. And I will admit that I've gotten slack on drinking enough water--some days only drinking 1-2 water bottles full!

My goal for December, in addition to eating reasonably well, is to drink enough water each day. I read somewhere a long time ago that we should drink half of our weight in ounces. So if a person is 150 pounds, they would drink 75 ounces of water each day. Makes sense to me and is a great goal to work towards!

This will be a challenge....especially at work, when bathroom breaks are few and far between. Just keeping it real, folks! But I'm willing to give it a try for the whole month to see how it affects my general health and well-being!
My favorite Lifefactory water bottle!

December is here. Let's end the year on a healthy note!


Wednesday, September 25, 2013

Produce Box

We purchased a Groupon this summer for a box of organic produce. The regular price for this box (which includes delivery) is $32 but we paid half-price for it through Groupon. We decided to use it to help our grocery budget this month.

We were very happy with the contents of the box. Everything looked great! The broccoli and pears caught our eyes first thing!

The box included:
  • 2 heads broccoli
  • 1 bunch celery
  • 1 head lettuce
  • 1 red pepper
  • 2 zucchini
  • 1 bunch green onions
  • 1 onion
  • 5 potatoes
  • 2 apples
  • 2 pears
  • 3 jalapeno peppers

Do I think it's a great deal? Well, it depends. For $16, yes. But at this point, I can't justify $32 for this amount of produce even though this is about what I would pay in the store for organics. If our grocery budget were to increase significantly, I would definitely consider this service.

The other thing is that we plow through a large amount of fruits and veggies each week. This box is for a family of two for a week. We would need 2 of these! :-)

All that to say, we really did like the produce!

What do you think--expensive for organic produce or a good deal?


Thursday, September 12, 2013

Dividing Nuts Into Portions


 Each month we buy some bags of nuts for snacks, usually from Trader Joe's. Their nuts don't have unhealthy oils and are very good quality.

Nuts are expensive and eating too many of them is counter-productive to weight loss.

So to help them last longer and make sure we ,meaning I, eat only an appropriate amount, I've started portioning them out into small containers and baggies at the beginning of the month.

We love this--the nuts are ready to grab and go and they last longer too!

When following the serving size recommended on the back of the bag, we end up with 15-16 servings of each kind of nut.

I don't have enough reusuable snack containers so I used sandwich bags too. To cut down on waste, we just put the empty bag back in the snack box to reuse the next month!

This has worked so well, I've been prepackaging other things too like cottage cheese and grapes. Super handy for packing lunches!

Monday, September 09, 2013

Homemade Mayonnaise


I've been wanting to try making my own homemade mayonnaise for a long time now! The raw egg thing kind of freaks me out so I've  waited to try it until I had a good source for farm fresh eggs.

Store bought mayonnaise usually features less than healthful oils and often sugar too! So by making my own, I'm able to use good oils and make a more healthful product.

I had "make homemade mayo" on my list for this week and then I saw that Money Saving Mom is hosting a "Make It From Scratch" challenge. I don't know if I'll join in every day this week with a new project/recipe but today I will!

I had read several recipes for mayonnaise and finally decided on this one from Happy in Dole Valley.

 I don't have sunflower oil on hand so I substituted olive oil and grapeseed oil. Almost every recipe I read said to use extra light olive oil and not extra virgin as the taste will get really strong. My olive oil is labeled as a combination of refined and virgin. To be on the safe side, I combined it 50/50 with grapeseed oil. We'll see how it tastes after it sets a while!

The mayo was super easy to make. I used my food processor; you can also use a blender, immersion blender or by hand with a whisk.

First, I gathered my ingredients.


Then I put the egg and seasonings into the food processor.

After starting the processor and mixing the ingredients, I began pouring the oil in very slowly.

And lo and behold, we have mayonnaise!

We thought it tasted very good! I plan to use it in chicken salad tomorrow.

Have you tried anything new recently?  I'd love to hear about it in the comments section!

**This post is part of the Make It From Scratch week at Money Saving Mom.**


Wednesday, August 14, 2013

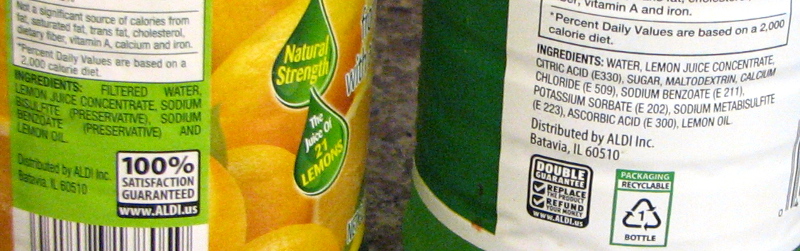
A Reminder To Read Ingredients Lists


 New bottle on the right--the packaging isn't the only change!

Recently, I used up a bottle of lemon juice and pulled a new one out of my pantry to use.

While pouring the lemon juice out of the bottle, I just happened to catch sight of the ingredient list. It included sugar and several other ingredients I didn't remember reading on the bottles before.

A few days later, I was organizing my recycling bin--to make room and squeeze a few more days out before a trip to the dump. I came across the old bottle and looked at the ingredients.
Old on the left; new on right.

Sure enough, they were very different.

Now, I realize that most  bottled lemon juices have additives and the most healthy lemon juice is what you squeeze yourself from fresh lemons. So I'm not even going to pretend that one bottle was healthy and the other is not. I buy bottled lemon juice for the convenience; I know there are some things added. I just don't think there needs to be that many of them!
Old bottle on the left; new on the right.

We try to limit added sugar in many of the products we buy, so I am a little disappointed that the new formula now has sugar and a bunch of other  additives.

That said, I will no longer be purchasing lemon juice from Aldi. If I need to purchase bottled lemon juice, I'll be looking for the purest form available affordably. Otherwise, I guess we'll be squeezing and freezing our own using this method. Not quite as convenient, but it would work.

Anyways, this is a reminder to me to read the ingredients periodically since they are known to change over time!

Do you read labels?


Saturday, August 10, 2013

Eva's Eggs


Finally.

We've found an affordable source for fresh eggs! I'm very excited.

I've been able to get some fresh eggs from the farmer's market some weeks but they are usually $3.50-$4 a dozen. As many eggs as we eat, I simply cannot afford to buy a month's worth of eggs at that price. Even though they are worth every penny and are extremely nutritious.

So I was happy to discover that one of the ladies in the local Southern Gospel group that my husband is a part of has begun selling eggs from her chickens. For $2 a dozen. And she'll bring them to rehearsal each week, so I don't even have to make an extra trip even though her house isn't that far away.

I will gladly purchase what I can from her and then supplement with grocery store eggs if needed!

Monday, July 01, 2013

Poison Ivy Relief

I must've come in contact with poison ivy and/or sumac while working in the yard last week. I wore gloves but not long sleeves--my arms are very itchy and rashy. 

I began googling and researching poison ivy after my mom suggested that's what it sounded like. As I read the symptoms of poison ivy/sumac/oak, I realized that it completely described my mystery rash last fall for which I eventually needed steroids to get rid of. So this may be the second time I've gotten poison ivy in under a year.

Awareness is huge--I now recognize that we have poison ivy and sumac on our property and can take care to prevent coming in contact with it in the future. I've washed my shoes, gloves and gardening tools since the oil from the plants that causes the rash can stay on these things a long time. I don't want to keep coming in contact with this stuff!

But in the meantime, it itches. Really bad. What's a girl to do?

I've been using calamine lotion and aloe vera gel. These do help to relieve the itching but what has helped the most so far is baking soda and apple cider vinegar!

  • Mix small amount of baking soda and water into a paste and apply to rash.
  • Let dry. It will be dry in a couple of minutes and will start to flake off.
  • Rinse off baking soda mixture with cool water and carefully pat dry with towel. Vigorous rubbing can intensify the itch.
  • Spray or pour apple cider vinegar over rash. This will burn but only for a minute or two. (Since the rash is on my arms, I let them drip dry over the sink for a minute.)
With this method, I usually have no itching for about 1.5 hours and then only tolerable itching up to 2.5 hours. Sweet relief!  The rash seems to be starting to dry up too!

I'd rather not use stronger creams and medications unless absolutely necessary, although if I get desperate enough, I have no trouble resorting to those. But I'm glad this natural inexpensive method is working for me right now.

Do you have any poison ivy remedies to share?


Wednesday, April 03, 2013

Roasted Sweet Potatoes

These roasted sweet potatoes are similar to sweet potato fries but are a bit quicker for me to prepare.

I'm all about quick and easy food prep these days!

Roasted Sweet Potatoes

  • One medium sized sweet potato per person
  • Olive oil
  • Salt and pepper
Preheat oven to 400 degrees.

Peel sweet potatoes. Chop into smallish chunks. Place in a bowl or ziploc bag and drizzle some olive oil over the top, mixing to make sure all potato chunks are covered.

Place potatoes in a  single layer on a  cookie sheet. Sprinkle with salt and pepper.

Roast sweet potatoes for 30-45 minutes,stirring occasionally until potatoes are soft on the inside and brown and a little crispy on the outside.

Yum! We love these!

Wednesday, March 20, 2013

Spinach Cheese Casserole

I tried this recipe over the weekend and it was a hit. Even those who don't care for spinach said that it was pretty good.

Super easy too!

I got this recipe from a local magazine and wanted to share it here with you too.

This casserole would work very well for brunch or a light lunch or as a side dish to a heavier meal. Broccoli or any other kind of greens (such as collards) can be substituted for the spinach if you prefer.

Spinach Cheese Casserole

1- 10 ounce package frozen chopped spinach (I used 16 ounces and it worked fine.)
3 eggs, lightly beaten
8 ounces cottage cheese
3 Tablespoons flour
1/4 cup butter, melted
1/4 pound sharp cheddar cheese, grated

Preheat oven to 350 degrees. Cook spinach according to package directions and drain. Place in medium bowl and add eggs. Stir in cottage cheese, flour, butter and cheddar cheese until well mixed.

Spoon mixture into a greased 9 inch square baking dish. Bake for 50-55 minutes or until very lightly browned.

Enjoy!


Wednesday, February 27, 2013

Homemade Spice Blends and Mixes


One way I save a little money and minimize our consumption of preservatives is to make our own seasoning and mixes!

These are very quick to make especially if you have a  well-stocked spice collection.

Some of our favorites and the mixes I have on hand right now:

1. Rotisserie-Style Chicken Seasoning. I almost always use this when cooking a whole chicken. I triple or quadruple the spice blend recipe and have it on hand to save me time later!

2. Israeli Spice Rub. This is one of our very favorites--a little spicy. Good for chicken breasts  and even chicken legs. I've also used it on a turkey breast and want to try it on fish.

3. Ranch Dressing Mix. I've only used this in a recipe so I can't vouch yet for how it would taste as a dressing. But we really liked it in a  recipe. I did whir mine in my coffee grinder for a powdered consistency.

4. Onion Soup Mix. I've used this in both casserole recipes and as a dip. It's very good. The turmeric does make the dip rather yellow so if that bothers you, it can be omitted; I didn't notice any extra flavor from it.

5. Taco Seasoning. Simple and easy! I was using a recipe that was good but about a mile long. This is much easier with only a few ingredients!

These take minutes to mix and are easy to store in Mason jars--mostly pint or half-pint. I keep lids from mayo (and honey) jars to use on my jars for storage. The lids aren't exactly aesthetically pleasing but I'm ok with that! Baby food jars can be used to store small amounts of mixes as well.

I like to keep my spice blends in the freezer for freshness but if you're going to use them pretty fast, they should be fine in your cabinet.

These mixes are so handy to have all made up and ready to use!

Do you make any homemade mixes? 

Monday, February 11, 2013

Pinned It, Made It: Garlic Beef Stew and Cauliflower Mash

I love crockpot meals. I also like crockpot meals that are very low-grain or grain-free.

We made some major changes in the way we eat almost 2 years ago now; the main change being that we no longer eat wheat and bread and pasta type things on a regular basis. We feel so much better when we eat mostly grain-free! In addition, we have both lost quite a bit of weight.

While we do eat some grains, mostly brown rice, and we do eat dairy, I've found that many recipes geared for the Paleo diet work well for us. The Paleo diet focuses mostly on meats, eggs, vegetables, fruits and nuts-- a "caveman diet".

A while back I pinned this great list of 30 Nights of Paleo Crockpot Meals. There are some really good looking yummy recipes in the list, whether you eat grain or not!

I decided to try the Garlic Beef Stew with Mashed Cauliflower. The stew was good-- I used 1 pound of beef as that's all I had and used Italian seasoning because I didn't have marjoram. The recipe calls for 6-12 cloves of garlic. I used 6 to be on the safe side and we felt it was plenty garlicky!

The mashed cauliflower was awesome! We aren't big fans of cauliflower so to say we really like a cauliflower recipe is saying something. I had tried mashed cauliflower before but for some reason had never thought to use the food processor to blend it up. The result was a very creamy mashed potato-like texture which we loved. 

The turmeric in the cauliflower gave it a bright yellow color which matched the shirt Andy was wearing. We both got a laugh out of that!

I will definitely make both of these recipes again.

This was a great winter meal--warm and nourishing!

**This post is part of Pinned It, Made It Monday over at Country Girl At Home.


Thursday, February 07, 2013

"Long Winter's Bath" Soothing Bath Salts

As I mentioned earlier this week, we've had colds, congestion and other sickies going around our home. Nothing serious and certainly not those terrible stomach viruses I've heard are going around, but enough to make us feel nasty.

For some reason, we've had a more difficult time keeping colds and such at bay this winter--this is the 3rd cold I've had since December!

I'm upping our supplements, making sure we are eating healthfully with minimal sugar consumption and replenishing our natural medicine cabinet which will include a large order to Beeyoutiful this week--love their products!

While I was cooking a batch of homemade elderberry syrup, I also mixed up a small jar of cayenne garlic honey mixture and a batch of these bath salts.

The recipe for the bath salts comes from an old Beeyoutiful catalog. It's very soothing and comforting and helpful for colds, congestion and if you're just not feeling well.

"Long Winter's Bath" Soothing Bath Salts

  • 2 cups Epsom salts
  • 1/4 cup sea salt
  • 2 Tablespoons baking soda
  • 1 teaspoon olive or sweet almond oil
  • 5-10 drops each of peppermint, eucalyptus and lavender essential oils
Mix everything together in a large bowl, breaking up any clumps. if you are wearing gloves, use your hands to rub the oils through the mixture. Store in glass jars.

Use 1/2 to 1 cup per bath.

I wanted to make some cute labels/tags for my jars so I used this idea to make some sewn tags!

I traced my lids onto brown paper--I recycled a paper bag and used a ruler to make some lines.

I then sewed over the lines with red thread, cut out some little hearts from scraps of felt and sewed them on too.

The last step was to cut out the circles, write on them and put them in the lids! Super cute and makes me smile.


Tuesday, July 03, 2012

Patriotic Fruit

Real and nutritious food can be fun too!
**Patriotic Fruit Salad--I just used watermelon and blueberries.

I don't have a picture to share but the little ones and I made these pretzel and M&M treats today. Not anything close to nutritious or real food but a fun treat to make together and share with all the families!

**Both ideas courtesy of Pinterest!

Happy birthday, America!

Friday, January 13, 2012

Egg Muffins

My muffin pans have been feeling a bit neglected since we don't eat muffins and cupcakes anymore! So I'm coming up with other ways to use them.

I created these egg muffins one day when I needed a really quick portable lunch. And I had just gotten a bunch of eggs seriously marked down in price!

Egg Muffins

Ingredients:
eggs--one per muffin
shredded cheese, cooked bacon or sausage, finely chopped veggies (one, two or all--you choose)
salt and pepper
parsley--optional

Instructions:
Grease muffin tins. Place some  shredded cheese and meat, if using, in bottom of each tin. Pour one beaten egg into each tin. Sprinkle with salt, pepper and parsley.

Bake at 350 degrees for about 15 minutes or until cooked through. Egg muffins will puff up really nice in oven and sink down some once removed.

Let cool slightly and run knife carefully around each muffin to remove to plate.

**Leftovers heat up nicely in the microwave so I make double what we'll need and save the extras for the next day!

Monday, January 02, 2012

Dear Cookies


Dear Cookies,


I've really enjoyed your December visit. You are very tasty. I'd forgotten how addictive you can be. Your sugary goodness lured me in right after breakfast, for dessert after every meal and in between.  And you had me convinced that every time I caught a glimpse of you, I needed a handful of your yumminess. Which of course, I did. Happily!


Well, the party's over. It's not you, it's me. I love you, I really really do. But I really like being able to fit in my pants. And there is a beach trip coming up later this year.

We can still be friends though and I can't wait for your visit next year!

Sincerely,
Mary Ann

Wednesday, November 09, 2011

Making Yogurt In The Crockpot

Yogurt is easy to make in the crockpot! I follow these instructions from A Year Of Slow Cooking and have found it to work great.

When I first started making yogurt, I used a small yogurt maker that I picked up at Goodwill. It worked ok and made 1 quart at a time. But when I discovered that yogurt could be made in the crockpot I was eager to try it! Not only would I be able to make more at a time but it would eliminate the need for the yogurt maker and instead be made in the crockpot which can be used for lots of different recipes.

While yogurt making in the crockpot is super easy, you do want to plan to make it on a day when you're going to be mostly at home. And I find that setting the timer helps me to not forget about it!

  1. Pour a half-gallon of milk into crockpot. Put lid on and turn to low. Let cook for 2 1/2 hours. (Or until just below boiling.)
  2. Turn crockpot off and unplug. Let set for 3 hours. 
  3. After about 3 hours the milk will have cooled down to about 110-120 degrees. Sometimes it takes a bit longer; I set the timer for a few more minutes and come back and check the temperature. I don't usually use the thermometer; I just test it with my finger. If it's too hot, it will kill the cultures in the yogurt starter you're about to add. Too cold and it won't work either. I guess a good way to explain it is that it should be just a bit warmer than lukewarm. I've done it both a  bit hotter and a bit cooler and it has worked so not too scary! If in doubt, use a thermometer until you get a feel for it!
  4. When milk is right temp., scoop out a cup or two of warmish milk into a bowl. Whisk 1/2 cup of plain yogurt into milk. Any plain yogurt will work as long as it contains live active cultures. Stonyfield Farms organic plain yogurt is one of my favorites to use.
  5. Pour milk/yogurt mixture into crockpot and mix gently to combine the yogurt.
  6. Keeping crockpot unplugged, wrap with towels to cover and keep it warm. Let set to culture in a non-drafty place for 8-10 hours or overnight. I place mine in the bay window which is a nice sunny spot in my house! At the end of culturing, the milk should have thickened to make yogurt. Place crockpot in refrigerator to help it to thicken up a bit more.
  7. Eat!
Notes: 
  • Homemade yogurt will not be as thick as store-bought.
  • For a thicker Greek-style yogurt, line a strainer with cheesecloth or tea towel. Pour yogurt in and let whey (the liquidy stuff) drain off, leaving a thicker yogurt. Draining longer will result in a kind of yogurt cheese,similar to cream cheese, which I think is delicious with crackers or celery!
  • Pureed fruit or jam can be mixed into yogurt. We like to keep it plain and add fruit or honey right before eating.
  • The longer it cultures, the tarter the yogurt!
  • Save a half-cup of yogurt to add to your next batch. I like to drain it some before adding so it's a little thicker. 
  • For more information and pictures, go here. 
  • Previous posts I've written about making yogurt--Homemade Yogurt, Yogurt In The Crockpot, Steps We've Taken To A Healthier Diet.
Happy yogurt making!


If you have any questions, I will try to answer them.

Thursday, September 22, 2011

Items Of Interest

In which she writes a bunch of random things...


**During our morning walk, the graceful Cherished Dog laid down in the grass beside the road to roll around and fell off the curb.


**Compared to Steve, these regular size squashes look like midgets. 

**It's been 6 months since we've changed our eating habits. I've lost somewhere in the 25 pound range and Andy has lost close to 40 pounds! We've both dropped several clothing sizes as well. This may be a fluke since women's clothing sizes vary so much, but I recently purchased a size 8 dress for myself. And it fit!!!


**There's a little progress on the little doll quilt that I'm making. I sewed the remaining triangles together into small squares. (Still need to trim them!) Next up-- sew the small squares into larger quilt blocks. My goal is to have this ready for quilting by the end of next week. 


What have you been up to?


Wednesday, July 27, 2011

Summer Salads

Between our hot summer and eating a low-carb diet, we've been enjoying lots of salads! I've been trying to plan at least one main dish salad for supper each week. If I have lettuce washed and ready and a few veggies already chopped, these meals come together pretty quickly and don't heat up the kitchen!

We've always eaten bread items with our salads up to now, so it's been an adjustment not to have that extra carb to fill up on with our salad. Instead, I make sure that the salads are packed with protein, lots of veggies and some healthy fats to satisfy our hunger.

Some salads we've been enjoying:

Taco Salad


 BLT (Bacon, Lettuce & Tomato) Salad with hard-boiled egg and Swiss cheese.


 Shrimp and Avocado Salad. Top a green salad with already cooked shrimp and fresh avocado chunks.

Salad with grilled chicken or steak.

My sister in law emailed me with some salads that she's been enjoying this year. These all sound delicious as well!

Asian
lettuce
green onion
red bell pepper
cilantro
carrots
edamame
grilled chicken
cashews
Ken's Asian dressing (She uses lite.)

Blue Cheese Salad
lettuce
tomato
cucumber
sweet onion
green apple
bacon (or you can use bacon bits)
blue cheese crumbles
Marzetti's Blue Cheese dressing (She likes the lite variety) with a drizzle of balsamic vinegar.

Beet, Chicken and Feta
lettuce
sweet onion
fresh beets (cooked and sliced-I have been getting these at the farmer's market- yum!)
crumbled feta
walnuts
grilled chicken
balsamic vinaigrette

Our favorite homemade dressings: 

Balsamic Vinaigrette

Basic Vinaigrette

Garlic-Herb Vinaigrette


What are your favorite salad combinations? 

**This post is linked to Works For Me Wednesday!

Tuesday, June 14, 2011

Beet Salad

I made this beet salad using beets from the Farmer's Market. I can't remember what the name of this beet is, but it's red and white striped. Very pretty!

Edited to add:  Thanks to Kathryn who commented and suggested that this is a Chioggia beet. Couldn't remember what the farmer called them but knew it started with a 'C'. :-)

I copied this recipe from The Brown Bag Lunch Cookbook a few months ago. One thing that attracted me to this recipe was that it only made one serving since I'm the only one here that likes beets.

This was not the most photogenic salad but very easy and tasty. And very healthy!

 Beet Salad

1/2 cup grated raw beets
1/2 cup grated carrot
1/2 cup grated apple
1/2 cup grated cabbage
2 tablespoons chopped walnuts or pecans
Balsamic Vinaigrette

Mix everything together and dress with vinaigrette.

Makes one large serving or 2-4 servings if using as a side dish.

Enjoy! Beets are very high in folate, a B vitamin!

Tuesday, June 07, 2011

A Year Of Healthy Habits -- Eat More Veggies

Every month this year, I've been choosing one healthy habit to focus on and add to my routine.

This month I'm focusing on eating more veggies. Especially raw ones.

 Other than tomatoes, we don't eat many canned vegetables. Not only are they lower in nutrients, we don't think they taste that good!

We do, however, eat a good amount of frozen veggies. They're easy to prepare and inexpensive to purchase.

I'm making it my personal challenge this month to add raw veggies to almost all lunches and suppers.

This is a good time of year to focus on eating well as fresh produce is so prevalent! With the days getting so hot now, I really would prefer a salad to something hot and cooked most days.

Of course, salads are always a good option as are fresh cut up veggies. I also like adding fresh spinach to fruit smoothies. A banana or canned pineapple will help to mask the flavor. Since we are not eating bread these days, we eat a lot of lettuce wraps for lunches. This is also a great way to sneak in something raw!


What are your ideas for getting more raw veggies into your diet?